Basic enrollment
Intro
Enrollment is where customers sign up for your power plan, typically in a linear flow. Behind the scenes, the flow attaches a Location entity to an Account entity.
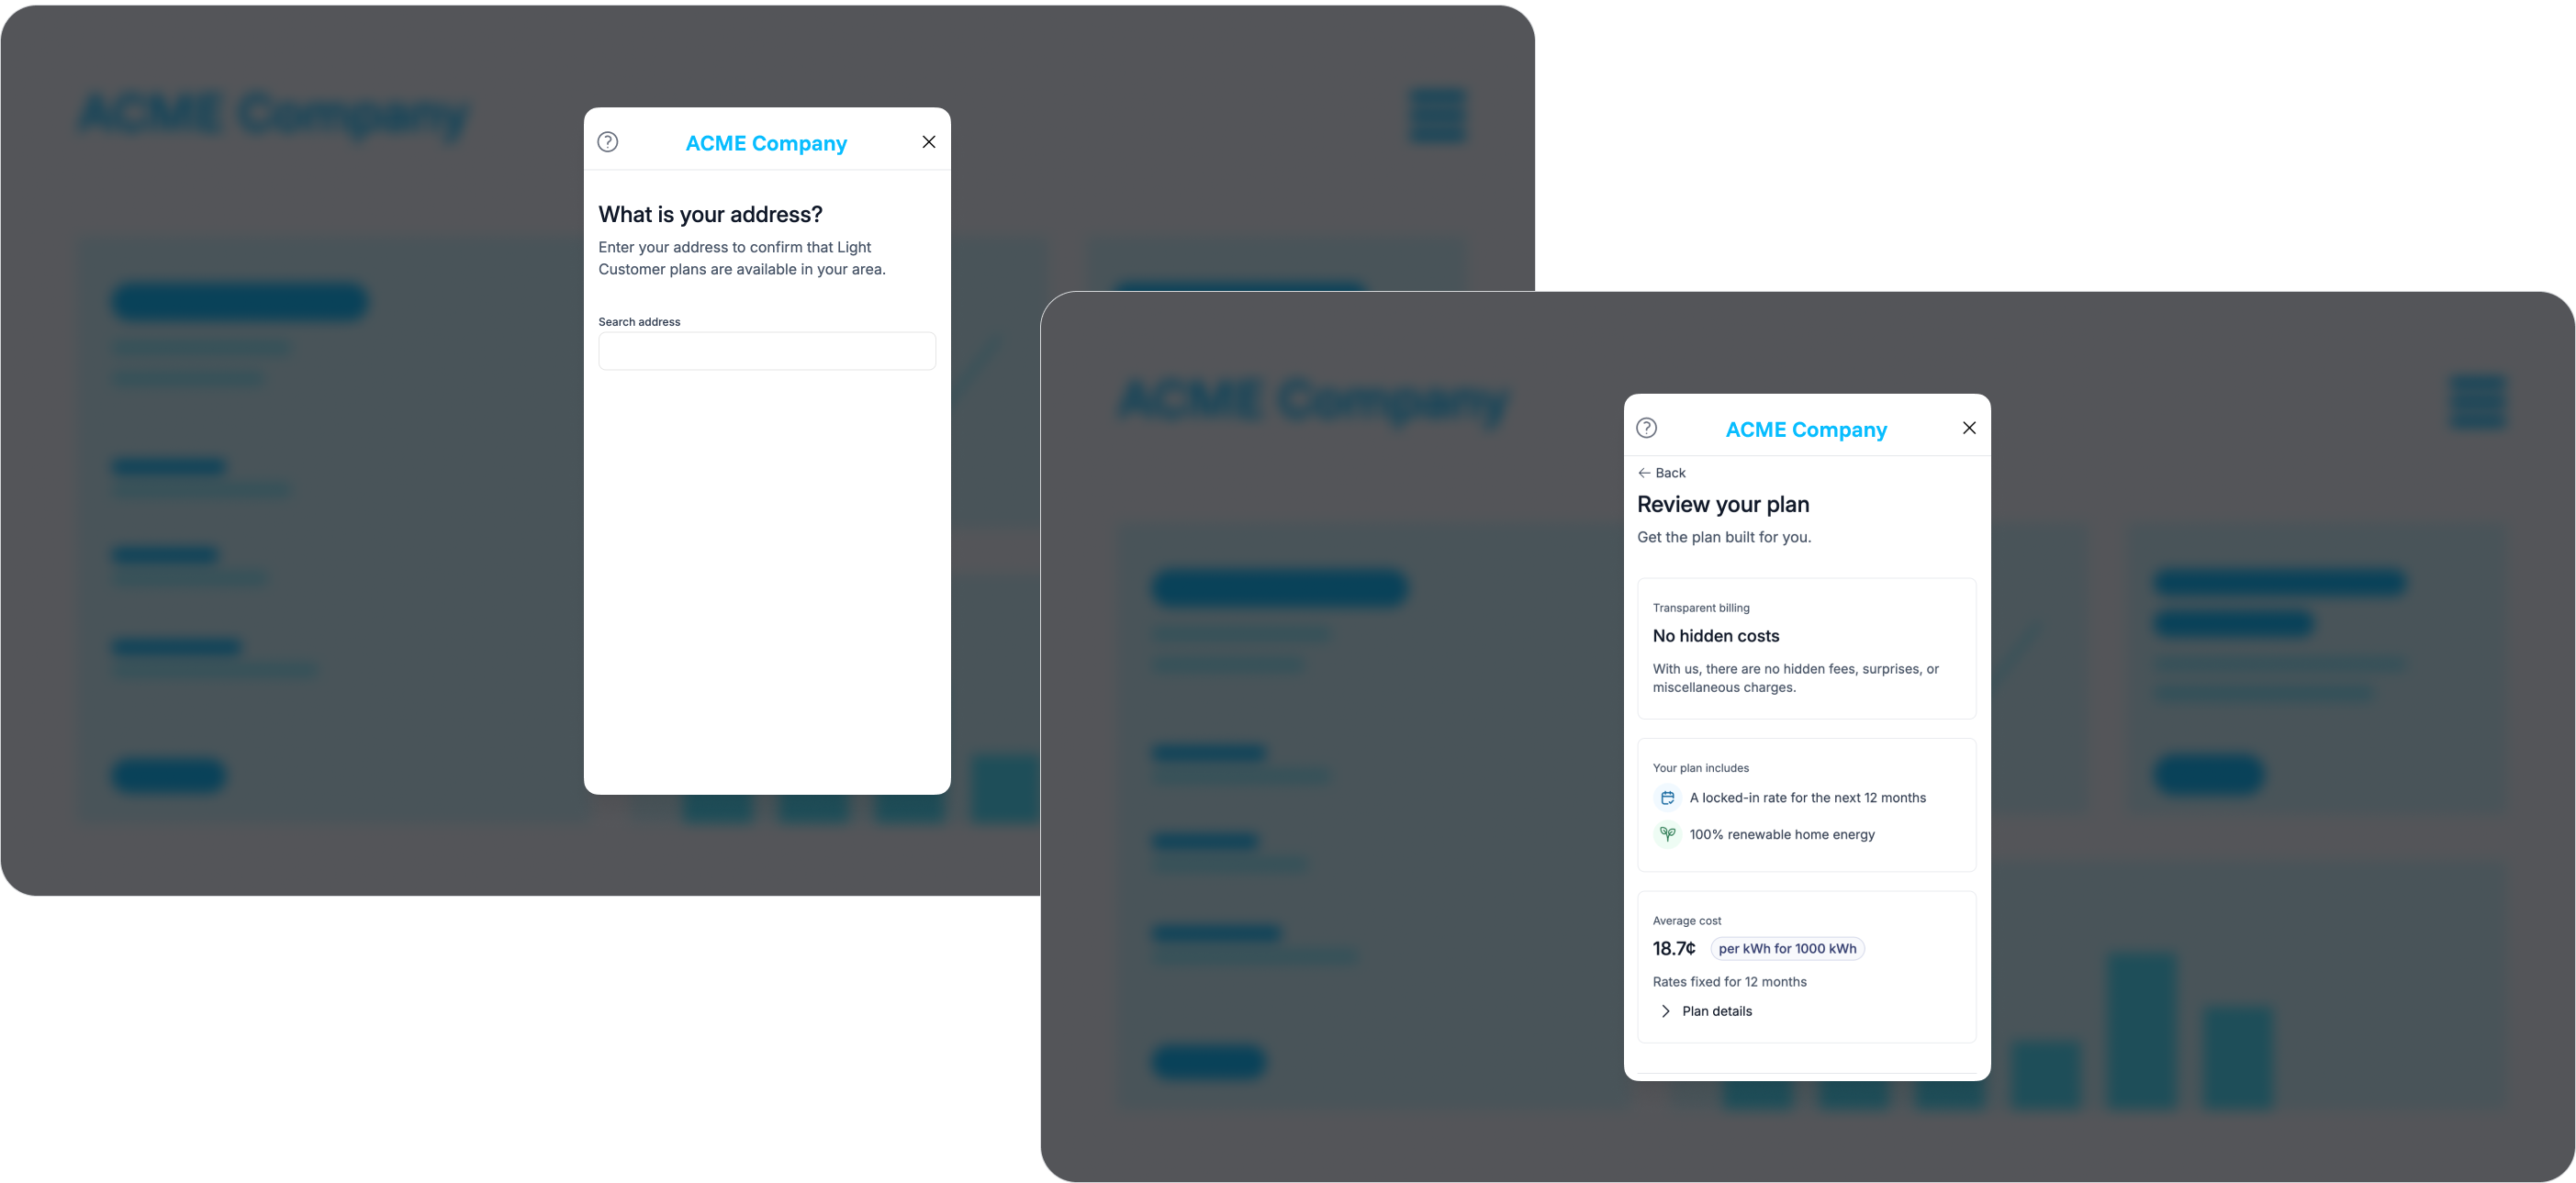
The enrollment experience can be completely customized by using our API with your UI. Light also provides an optional, low-code embedded flow (prebuilt UI) that can be embedded into your website or mobile app. The embedded flow includes a full enrollment experience that appears in a modal overlaying your experience.
The embedded flow can be a great way to get started with a branded and complete enrollment flow embedded within your existing UI. If you want a more customized experience, we recommend using the API.
Both the API and embedded flow require you to have an app token and create a customer account prior to enrolling it. Refer to the first two steps in our quickstart to learn how to do that.
Prerequisites
- An account or invite to the Light dashboard
- An existing web or native mobile app to add the enrollment experience to
- If not, see our example app
Embedded flow
The embedded flow lets you skip all of the UI work needed to create an enrollment flow. Only app token authentication and not account tokens is needed for this implementation. Use the enrollment scope to surface this specific experience. Learn more
Our quickstart is a much more in-depth tutorial for implementing the enrollment flow in a pre-built UI.
Pre-filling address information
If you already have an address for your user and are using an embedded flow, you can set the preliminary_address field when creating the Account. This will be used as a suggestion when the user is searching for their address. If the location is eligible, then we see around 90% of these addresses end up matching one we have on file. If there is a match we will skip the address search step, while allowing the user to optionally correct the address.
The preliminary_address field is essentially passed to the full address search API described lower in the API section. That API does some normalization to the address to try and find an exact match to an address on file with the utility.
API
Using an API implementation creates a convinent user experience where you can embed the steps within your existing onboarding flows and skip UI steps for customer data you already have.
1. Create an account
This guide covers enrollments where the customer's service start date is within 30 days (or within your configured start date window). If the start date is further out, use the client agent enrollment flow instead.
(optional) Check location eligibility first
If you already have the customer's address or postal code, you can check eligibility before creating an account to avoid enrolling customers in areas that aren't served. Use POST /v1/app/accounts/enroll/eligibility with your app token (no account required).
{
  "postal_code": "78701"
}
{
  "eligibility_likelihood": 85,
  "utilities": [
    { "display_name": "ONCOR", "name": "ONCOR" }
  ]
}
eligibility_likelihood is a score from 0–100. If it returns 0, the address is not in a retail choice area and you can skip creating an account entirely.
Before starting the enrollment flow, create a customer account using POST /v1/app/accounts. At minimum you'll need the customer's email address, but you can also supply name, phone, and date of birth upfront to skip collecting it later in the identity step.
{
  "email": "jane.smith@example.com"
}
The response includes an account_uuid and an account_token. The account token is a short-lived token scoped to this specific account and is required for the enrollment steps that follow.
2. (optional) Register power of attorney
If you hold limited power of attorney (POA) for the customer and intend to accept a plan on their behalf, use POST /v1/app/accounts/{account_uuid}/record-client-agent to register that authorization. This call must happen before you call plans/accept on the customer's behalf, but it can otherwise be made at any point after account creation, before or after identity, credit, or payment steps.
Note that recording POA does not require you to accept the plan on the customer's behalf. Even with POA registered, the customer can still go through the regular flow and accept a plan themselves.
If the customer's start date is more than 30 days out, see the client agent enrollment guide for the full flow.
3. Identify the Location
Not every address is eligible for electricity retail choice, so it is important to be able to search and match the user's address to a valid utility service address registered with the utility. In Texas, valid addresses are identified by their ESI ID, a unique identifier designated by ERCOT.
Full address search
If you already have the address for the customer on file, you can attempt to map it to an address on file with the Utility by using this API: /v1/app/accounts/enroll/full-address-search.
This API will only return results that appear to be exact matches for the location provided. The API will attempt to do some address normalization in case the address you have uses 123 Main Street Apt 1 and the utility address is 123 Main St #1, it will still show matches. However it will not fuzzy-match mispellings or incorrect numbers like 124 Main St or 123 Mian St. We find that this often has 90+% accuracy with matching eligible addresses, and we are improving it over time to be even higher.
If there is exactly one result returned then it is most likely the correct address for the customer. If you get 0 results, then you may want to offer the type-ahead search or allow the customer to enter their ESIID from a previous utility bill as a fallback. The type-ahead API can help a customer sometimes correct these on their own if their street has multiple names or other common alternative names. It is possible to sometimes receive multiple results if there is more than one electricity meter for the location.
Type-ahead search by address
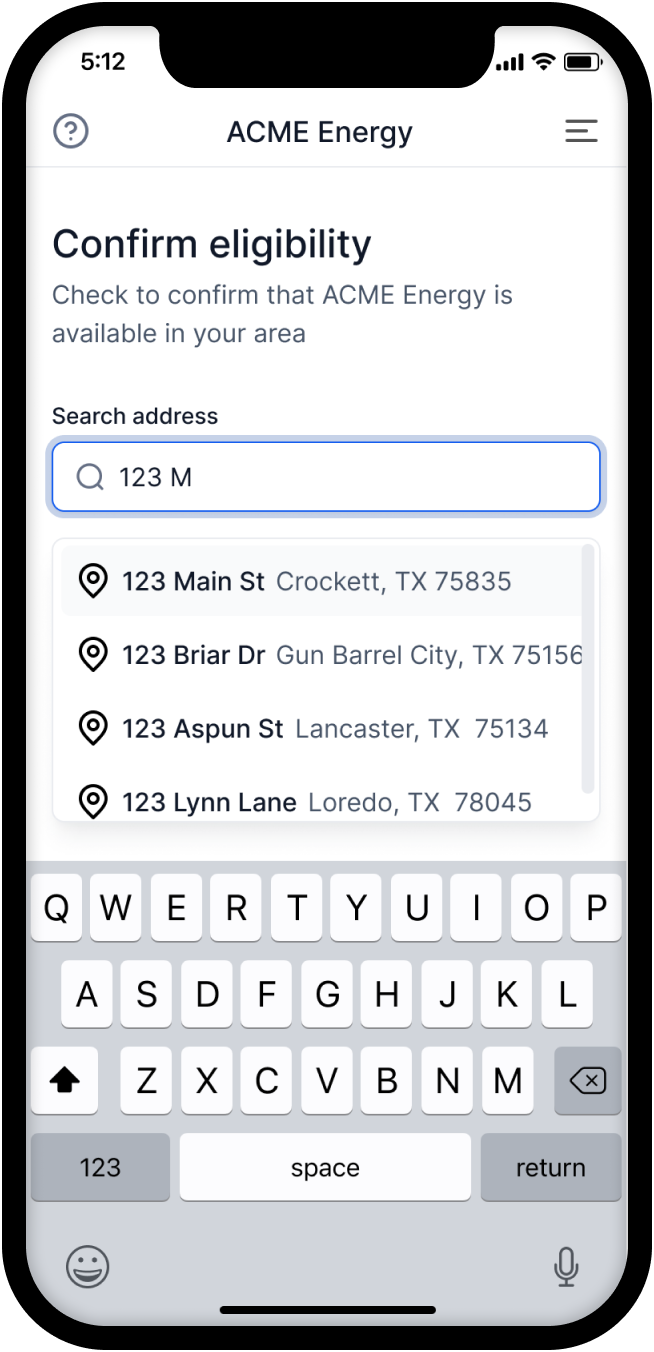
The /v1/app/accounts/enroll/address-search API is best to use if the customer's address is unknown or an exact match was not found. It is meant to be used as a type-ahead search where the user can start typing the beginning of their address and see results.
This API helps you map an address to its corresponding ESI ID by returning a list of addresses (and their ESI IDs) which match the search query. The search uses a fuzzy search algorithm to match the query to the address even if the query is not an exact match. The exact formatting of these addresses may not match that in other data sources like Google Maps since they come directly from the Utilities we work with.
This endpoint is provided as a convenience. However, because it uses fuzzy search and certain addresses can be very similar, it is critical that customers review and confirm the selection of their full address in a separate step and not rely on the ordering of the results from this API.
Search by Electric Service Identifier ID (ESI ID)
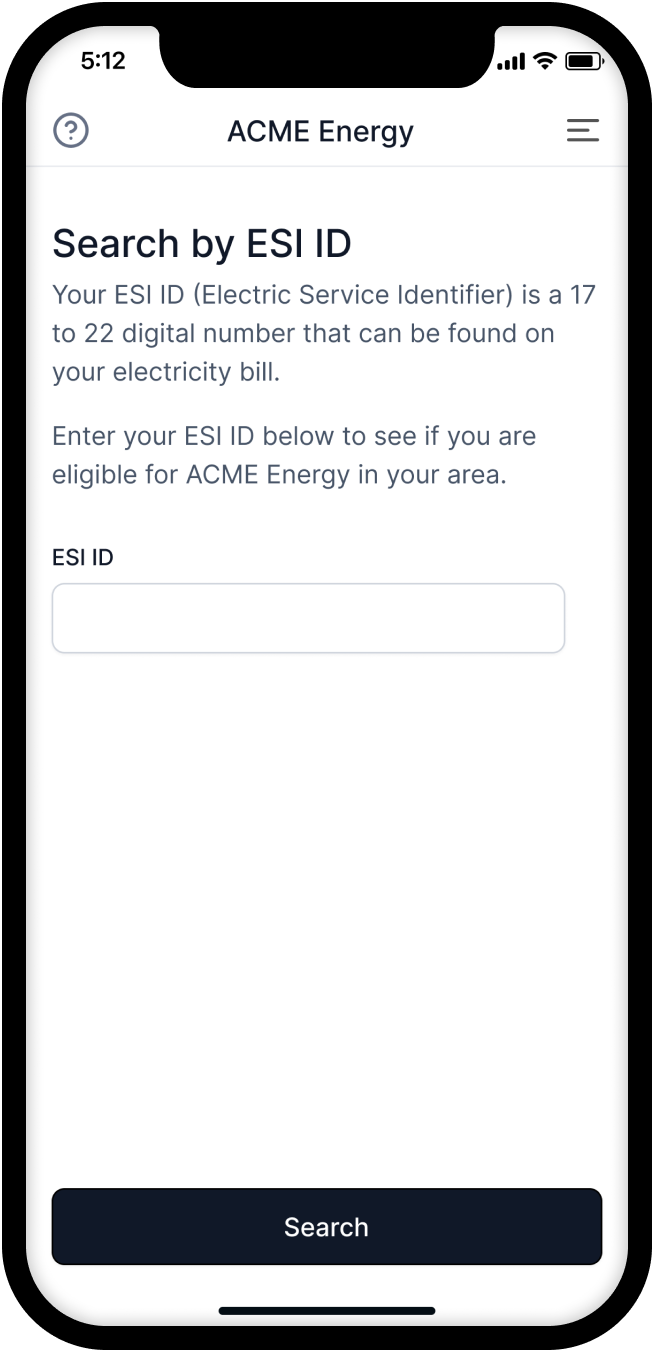
You can also identify a Location directly by ESI ID. This is a useful fallback to /v1/app/accounts/enroll/address-search when the user has their ESI ID available and wants to enroll in a plan using that ESI ID. They can usually find their ESI ID on a previous electricity bill. You can pass the ESIID collected to /v1/account/enroll/esi-id-search, which is useful for validating the ESI ID and returning the address for the user to confirm.
We recommend providing this as a fallback for when the address search does not return any results. This can sometimes be the case if the format of the addresses correlated with the ESI ID is sufficiently different from the address the user is searching for.
4. Confirm the address
All of the methods above help to identify the ESI ID for an address. The ESI ID is the unique identifier used by utilities that is needed to enroll a specific electric meter.
Once you have determined ESI ID from one of the search mechanisms above, the user must confirm the address details before proceeding with the enrollment process to prevent faulty or delayed enrollments. The utility account number (ESI ID) should also be shown to the user to confirm that they are enrolling the correct service location. The addresses returned by our APIs will likely look slightly different from those in your system, so even if you already had the correct address for the user make sure you are showing them the address returned by our APIs to confirm. Here is an example of what an integration might show a customer using that address response from the search above.
5. Request available plans
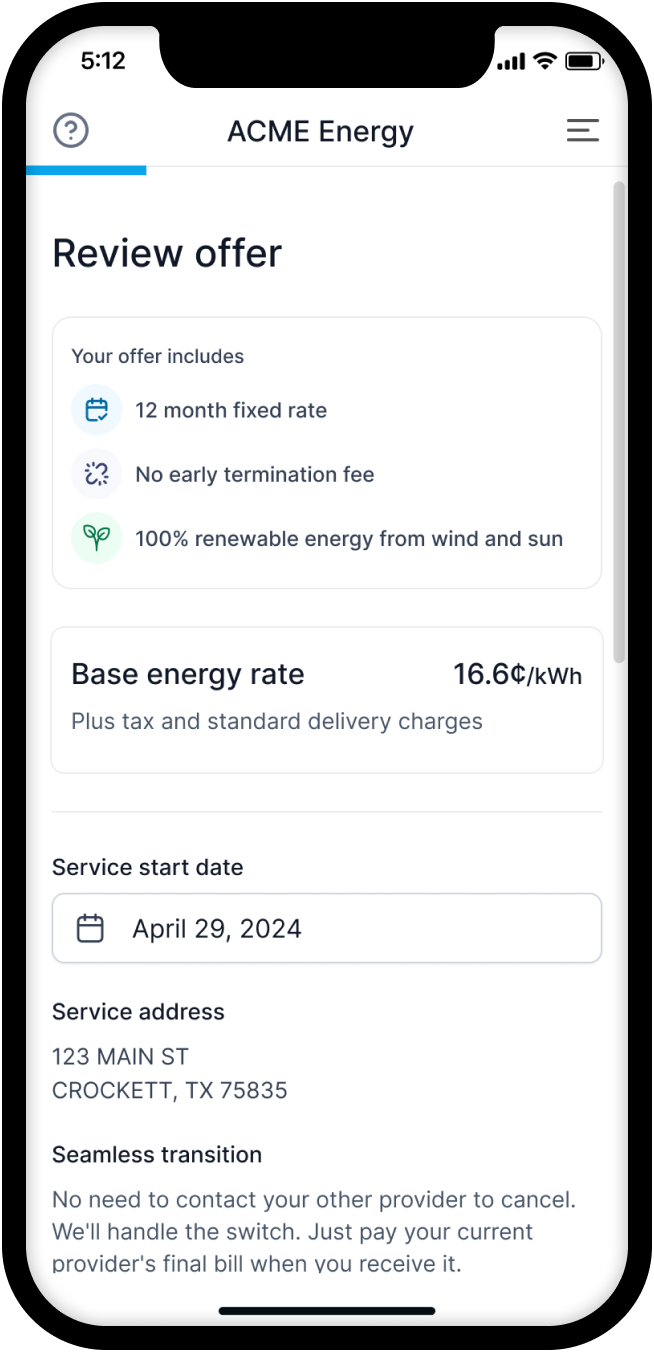
After the service location address is confirmed, the next step is to request available plans for the address. This can be done by using the /v1/app/accounts/enroll/plans/request API. This API will return a list of available plans for the address in which the user can enroll.
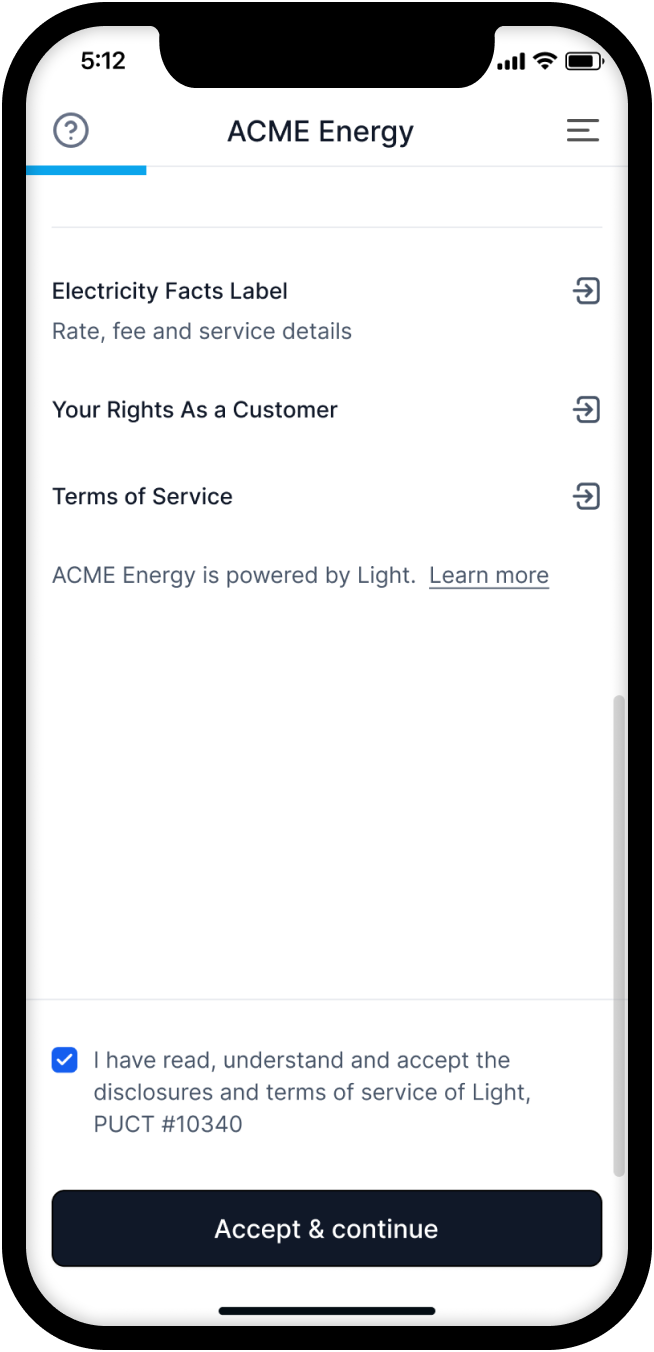
The plans contain details about all of the sub-components that make up the plan. This includes the energy rate, delivery (TDU) rates, monthly plan charges, term length, and links to the Electricity Facts Label (EFL) and Terms of Service (TOS) documents. The user can review the plans and enroll in them.
The response will also include PDF document links provided for your plans and must be linked to from your app for the user to review as needed. The plan details and variables that are contained within the EFL and TOS documents are also available in the API response for displaying some of the key components to customers in your app (for example the energy rate and term length).
You can also request plans without an ESI ID by calling /v1/app/accounts/enroll/plans/request. This API also allows features like customizing the rates per-account.
6. Accept the plan
After the user has reviewed a plan, they can choose to accept the plan and continue in the enrollment process. This can be done by using the /v1/account/enroll/plans/accept API. In the visual example above, this would be equivalent to the user clicking the button at the bottom of the screen to accept the plan.
When calling this API, the terms_accepted field must be set to true to indicate that the user has accepted the terms of the plan. The start_date field must be set to a date within the range of the earliest_start_date and latest_start_date fields from the plan details.
Calling this API will attach the ESI ID to the Account, creating a Location with a Contract including the terms of the accepted plan. However, the enrollment won't be finalized until the rest of the enrollment steps below are finalized.
You can only call this API on behalf of a customer if you have registered power of attorney for their account in step 2 above. Without it, plan acceptance must be completed by the customer directly.
7. Verify identity
As part of the enrollment process, users must verify their identity to ensure compliance with regulatory requirements. This step helps protect against fraud and ensures the account is being set up for the correct individual.
The minimum information required to start service includes first and last name, phone number, email, and date of birth.
Set these fields when you create a user's account using POST /v1/app/accounts, or collect it later and send via PATCH /v1/app/accounts/{account_uuid}.
Once you have set these critical fields, confirm you are ready to check the customer's identity and supply additional information using PATCH /v1/account/enroll/identity. The more information provided, the stronger the likelihood of successful identity verification. The actual identity verification process won't start until after the enrollment is submitted.
8. Check credit
By default, we will perform a required soft credit check to determine your customer's eligibility. The credit check requires the user's full Social Security Number (SSN) and explicit consent to the terms of the credit check.
Use POST /v1/account/enroll/credit-check to submit the SSN to be used for credit check. The credit check will be processed in the background once the enrollment is submitted. If the account doesn't pass the credit check with SSN, then our support team will reach out directly to the customer via email for alternative credit verification methods.
9. Add a payment method
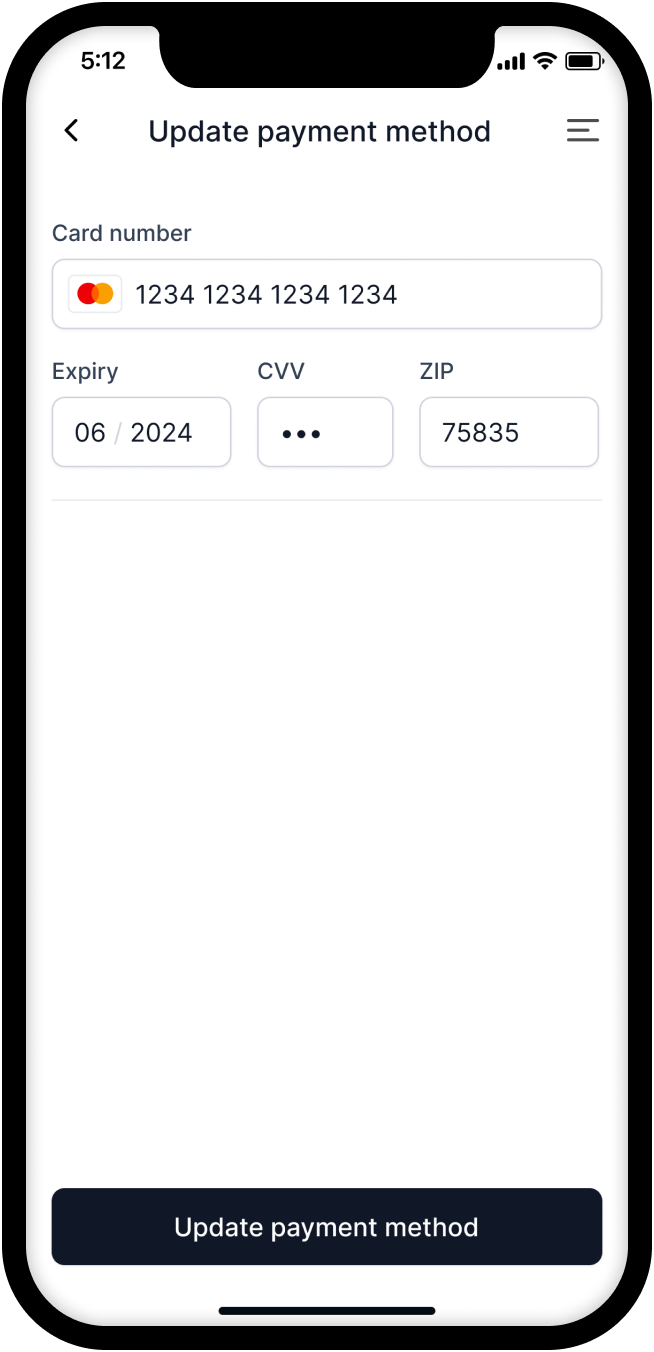
If you are using our built-in Stripe integration, you can access a Stripe public key in our /v1/app/accounts/{account_uuid} payload (app.stripe_public_key) to use in the various Stripe Checkout or Stripe Elements components that work with your frontend stack. If you are working in the sandbox environment, then this public key will be a Stripe test key with which you can use the standard Stripe test card numbers. You can also save a copy of the public key elsewhere or cache it for future use. It isn't likely to change frequently but may change over the years if needed for security reasons.
In order collect a payment method from the customer, you will first need to create a payment session using the POST /v1/account/billing/payment-session API. This API will return a client secret for this account that you can use to create a payment method using Stripe Elements along with the Stripe public key.
After the payment method is added to Stripe, you will need to confirm with Light by using the POST /v1/account/billing/ensure-payment-method-added API. This API simply takes the payment_method_id that is returned by the Stripe client SDK. Passing this to us will confirm that the payment method was successfully added through Stripe and sync it with the customer's Account on Light.
The payment method will not be immediately charged through these APIs; rather, it is saved to the customer's account for regular auto-pay invoice billing based on their next billing cycle. By default, payment methods are charged for the amount due on an invoice 16 days after the invoice is generated.
10. Finalize enrollment
The last required API call in the enrollment flow is POST /v1/account/enroll/finalize. A confirmation screen in your app does not complete enrollment. You must call this endpoint to submit the enrollment to Light.
Use the customer's account token (the same Bearer token used for other /v1/account/enroll/* endpoints). The request body is optional. For a standard enrollment, send an empty JSON object or omit the body.
curl -X POST "https://api.light.dev/v1/account/enroll/finalize" \
  -H "Authorization: Bearer $ACCOUNT_TOKEN" \
  -H "Content-Type: application/json" \
  -d '{}'
On success, the API returns 200 with an empty JSON object. If prerequisites are not met, it returns 422 with "Cannot finalize enrollment".
When to call it
Call finalize when the customer has completed the prior steps and is ready to submit their enrollment. Before calling, fetch GET /v1/account and confirm enrollment.can_finalize_enrollment is true.
That field is true only when all of the following are satisfied:
| Requirement | Check on enrollment |
|---|---|
| A plan has been accepted | has_accepted_plan is true |
| A default payment method is on file | has_payment_method is true |
| Identity information has been submitted | is_identity_verified is true |
| Enrollment has not already been submitted | is_enrollment_finalized is false |
You should also have confirmed the service address and submitted the credit check (steps 3 and 8) before finalizing, even though those steps are not reflected in can_finalize_enrollment. If can_finalize_enrollment is false, use the fields above to see which step is still incomplete.
What it does
This endpoint submits the enrollment to Light. It sets enrollment.is_enrollment_finalized to true, populates enrollment.finalized_at, and fires the enrollment.finalized webhook. Identity verification and the credit check run in the background after submission. The customer receives enrollment confirmation email.
Until this call succeeds, the enrollment stays pending.
Finalizing does not mean electricity service is active. Utility switch processing typically takes 2 to 72 business hours depending on the utility and whether the selected start date is the same day. You can be informed as soon as an account goes live by using webhooks.
After finalization
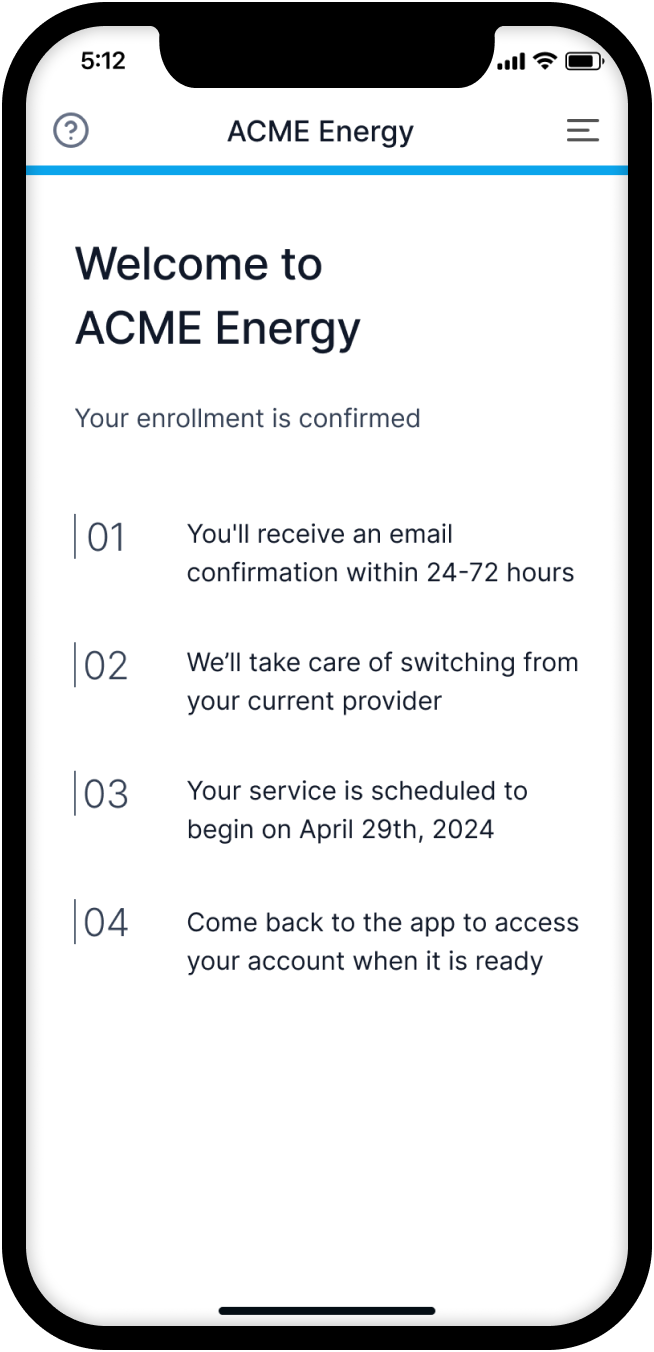
We recommend showing a confirmation screen similar to the one above until the Account's service is active.
Once the utility has accepted the enrollment, enrollment.is_service_active will be true in the GET /v1/account response.
The utility will also supply their usage history for the previous 12 months if available when enabling the service. This information is not received at the exact same time and may be available some hours before or after the service is active.
Related webhooks
Webhooks allow your application to receive real-time notifications about events that occur within the Light platform. This enables you to build responsive and up-to-date integrations without the need for constant polling. Learn more
enrollment.plan_requested
Triggered when a customer requests a plan. This event won't have a location set, but will have an account since the location isn't saved until the plan is accepted.
enrollment.plan_accepted
Triggered when a customer accepts an electricity plan.
enrollment.identity_updated
Triggered when a customer's identity information is updated.
enrollment.finalized
Triggered when an enrollment is finalized.
account.payment_method_added
Triggered when a new payment method is added to an account.
location.service_active
Triggered when electricity service becomes active for a location.
location.usage_history_available
Triggered when usage history becomes available for a location.